Automations
Automations let your home act on its own. An automation watches for something to happen — motion in the hallway, a door left open, sunset, a leak — checks a few conditions, and then does something: turns on a light, sends a notification, changes the house mode.
Automations are not Scenes. A scene is a preset that runs only when somebody taps it. An automation has triggers and conditions and runs by itself, on the Smart Panel backend, whether or not anybody is looking at a display. An automation can run a scene as one of its steps.
How Automations Work
An automation is a flow drawn on a canvas. The flow is made of blocks connected by lines:
| Block | Label on the card | What it does |
|---|---|---|
| Trigger | When | Starts the automation when something happens. Nothing can lead into a trigger. |
| Condition | And | Checks the state of the home and continues on its yes or its no output. |
| Action | Then | Does something and continues on done, or on error when it failed. |
| Flow control | Flow | Delay, Wait until, Any and All — shape how and when the flow continues. |
When a trigger fires, the backend starts a run: it follows the lines out of the trigger, evaluates each condition, executes each action, and ends when nothing is left to follow.
- Several lines can leave one output. Their branches run side by side, in no guaranteed order. When order
matters, chain the actions one after another through
done. - A condition that cannot answer — the device is offline, the value is missing or invalid — continues on
no, with the reason recorded. Unknown is never true. - An action that fails continues on
error. If nothing is connected toerror, that branch ends and the run is marked Failed; other branches carry on. - Every condition and action has a timeout (30 seconds unless the block says otherwise), so an unresponsive device cannot hold a run open.
Each automation has:
- Name and an optional Description
- Space (optional) — a room or zone. It is only used to find the automation in lists and to show it on that room’s panel; it does not limit what the automation may control.
- Run mode — what happens when a trigger fires while the automation is still running (see Run Modes)
- Enabled — a disabled automation never runs
- Status — OK, Invalid (a block is not configured correctly or refers to something that no longer exists) or Suspended (it ran too often and was stopped)
Only owners and admins can create and edit automations. A wall panel can only list the automations of its room and switch them on or off.
Blocks
The palette on the left of the editor lists every block that is available. Blocks provided by a plugin appear only while that plugin is enabled.
When — triggers
| Block | Starts the automation when… |
|---|---|
| Device value changes | A device value changes in any way, becomes a value, changes from a value, changes from one value to another, rises above a threshold or falls below one. Optionally only once it has stayed like this for a time (up to 7 days), and with a hysteresis for thresholds. |
| Button is pressed | A button is pressed — every press, or only the presses chosen, such as a long press. |
| Device goes offline or online | A device loses its connection, comes back, or both. |
| Time of day | It is a time of day on the house clock, every day or on chosen days. |
| Sunrise or sunset | It is sunrise or sunset at the house location, or up to 6 hours before or after it. |
| Scene was run | A scene has been run, from anywhere: the panel, the admin or another automation. |
| House mode changes | The house mode changes to a mode, from a mode, or in any way. |
| Security state changes | The alarm is armed or disarmed, or the alarm state changes, e.g. when the alarm goes off. |
| Space occupancy changes | A room or zone becomes occupied, becomes vacant, or both. |
| Space mode changes | The activity mode of a room or zone changes. |
| Manual start | Only when somebody runs the automation by hand. |
And — conditions
| Block | Continues on yes when… |
|---|---|
| Device value is | A device value is equal to, not equal to, greater or less than, between, or one of the values given. |
| Time is between | The house clock is inside a window, optionally on chosen days. The start is included, the end is not; a window may cross midnight. |
| Day or night | It is day (the sun is up at the house location) or night, as chosen. |
| House mode is | The house mode is one of the chosen modes. |
| Alarm is armed | The armed state of the alarm is one of the chosen states. |
| Space is occupied | The occupancy detection of a room or zone says it is occupied, or vacant, as chosen. |
| Space mode is | A room or zone is in one of the chosen activity modes. |
Then — actions
| Block | Does… |
|---|---|
| Set device value | Sets up to 20 device values. Values of the same device are applied together; different devices are written side by side. |
| Run scene | Runs a scene and waits until it has finished. |
| Send notification | Raises a notification with a severity, a title and an optional message. |
| Set house mode | Changes the house mode to Home, Away or Night. |
| Arm alarm | Arms an alarm: home, away or night. An automation cannot disarm it. |
| Set space mode | Activates an activity mode of a room or zone, without pausing its occupancy detection. |
| Set space lighting | Turns the lights of a room or zone on or off, applies a lighting mode, or controls the lights of one role. |
| Enable automation / Disable automation | Switches another automation on or off. |
| Run automation | Starts another automation as if it were run by hand, without waiting for it. |
Flow control
| Block | Behaviour |
|---|---|
| Delay | Waits for a time, at most one hour, and then continues. |
| Wait until | Waits until a device value becomes a value, or is above or below a threshold, for at most a time (up to one hour). Continues on out when it does — immediately if it already holds — and on timeout otherwise. |
| Any | Continues with the first branch that arrives; later branches of the same run stop here. |
| All | Continues once every branch leading to it has arrived in the same run. |
All is a strict AND. It continues only when a token has arrived on every line leading into it, in the same
run. If one branch stops earlier — a condition answered no, an action failed — All never continues, and the
run trace shows which line was missing. Because a run starts from one trigger, an All fed from two different
triggers can never continue, and such a flow cannot be saved. To express “A and B within 30 seconds”, use a
Wait until after the first trigger.
The Time of day, Time is between, Sunrise or sunset and Day or night blocks use the house
timezone and the house location from the system settings. The sun blocks cannot be enabled until a location is
set. While the system clock has not been set yet — a Raspberry Pi after a power cut, before it reaches the
network — time triggers do not fire and time conditions answer no.
Run Modes
The run mode decides what happens when a trigger fires while a run of the automation is still active — usually because it is parked on a Delay or a Wait until. You choose it in When triggered while already running.
| Mode | Behaviour |
|---|---|
| Restart (default) | A new trigger stops the running automation — every active run, whichever trigger started it — and starts it again. |
| Single | While the automation is running, new triggers are ignored. |
| Parallel | Every trigger starts its own run, next to the ones already running (at most 10 at once). |
Saving a changed flow, run mode or enabled state also cancels the active runs. Changing only the name, description or icon, or moving blocks on the canvas, does not.
Rules of Thumb
One automation per concern
Under Restart, a trigger of one flow also stops every other flow on the same canvas. Keep unrelated jobs in separate automations. The editor shows a warning when a Restart automation holds flows that are not connected to each other.
Wait on a state with a “for” trigger, not a Delay
To act once something has stayed in a state — no motion for 2 minutes, a door open for 10 minutes — use Device value changes with Only once it has stayed like this for. The wait belongs to the trigger: when the value leaves the state, or the device goes offline, the wait simply starts again, whatever the run mode, and it is re-armed after a restart of the server.
Re-check the state after a Delay
A Delay only waits; it does not know whether the world changed meanwhile. When an action after a Delay changes something, put a condition (Device value is) between the Delay and the action that checks the state is still what you expect.
Remember the one-hour limit
A Delay and a Wait until can wait at most one hour, and a waiting run does not survive a restart of the server — it is shown as Interrupted. For longer waits, use a “for” trigger (up to 7 days) or a Time of day trigger.
Automations Overview
Navigate to Automations in the admin sidebar to see all your automations.
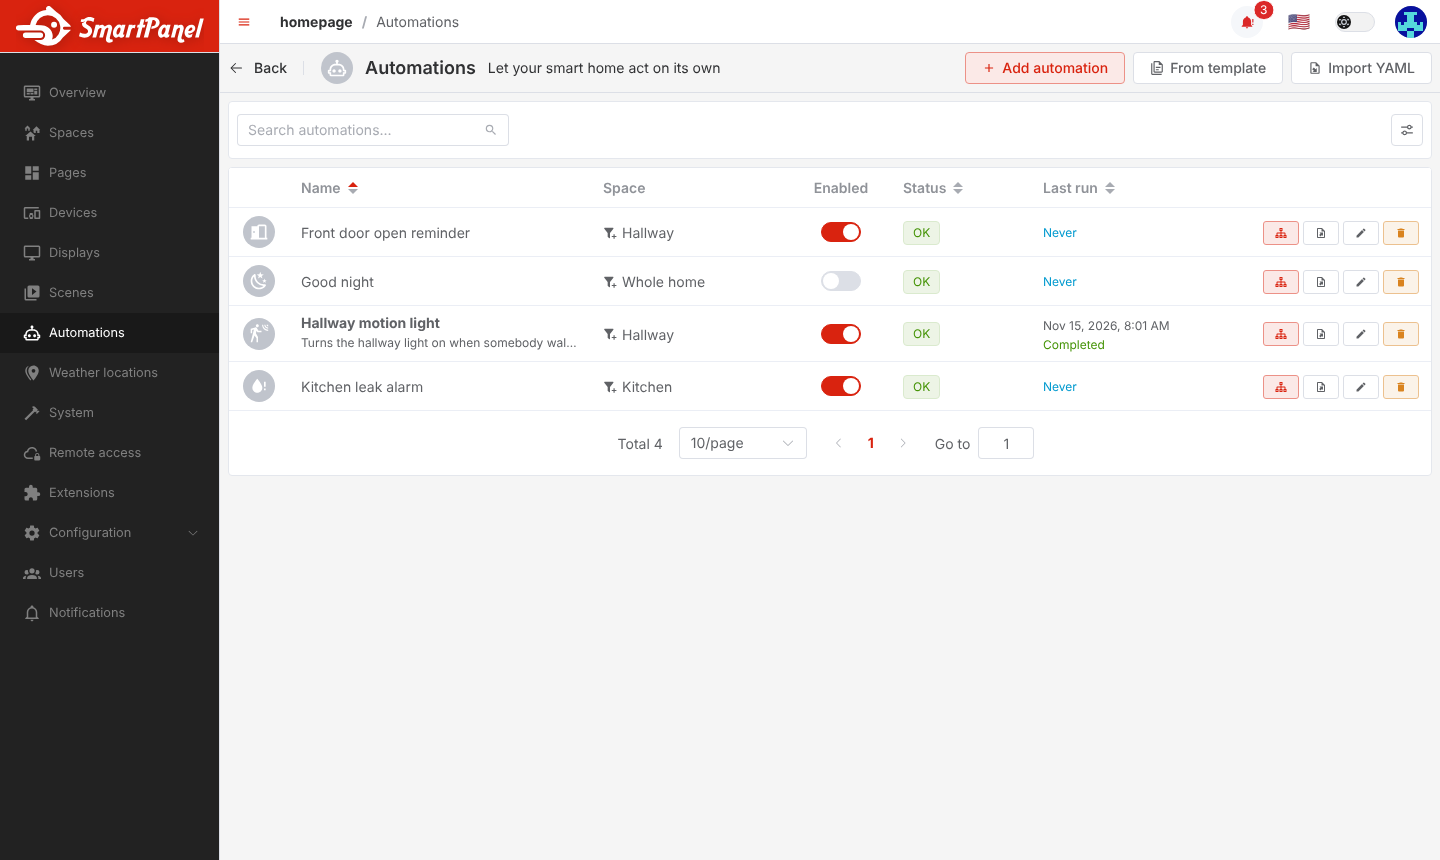
The list shows each automation’s space, whether it is enabled, its status and how its last run ended. From here you can switch an automation on or off, open its flow with Edit flow, export it as YAML, edit its name and settings, or remove it. Filters narrow the list by enabled state, status and space.
Creating an Automation
There are three ways to start:
- Add automation — name it now, draw its flow afterwards.
- From template — answer a few questions and the editor opens with the flow ready (see Templates).
- Import YAML — load an automation exported from another Smart Panel (see Import and Export).
A new automation is created disabled. It can be enabled once its flow has at least one trigger and every block is configured.
Building the Reference Scenario
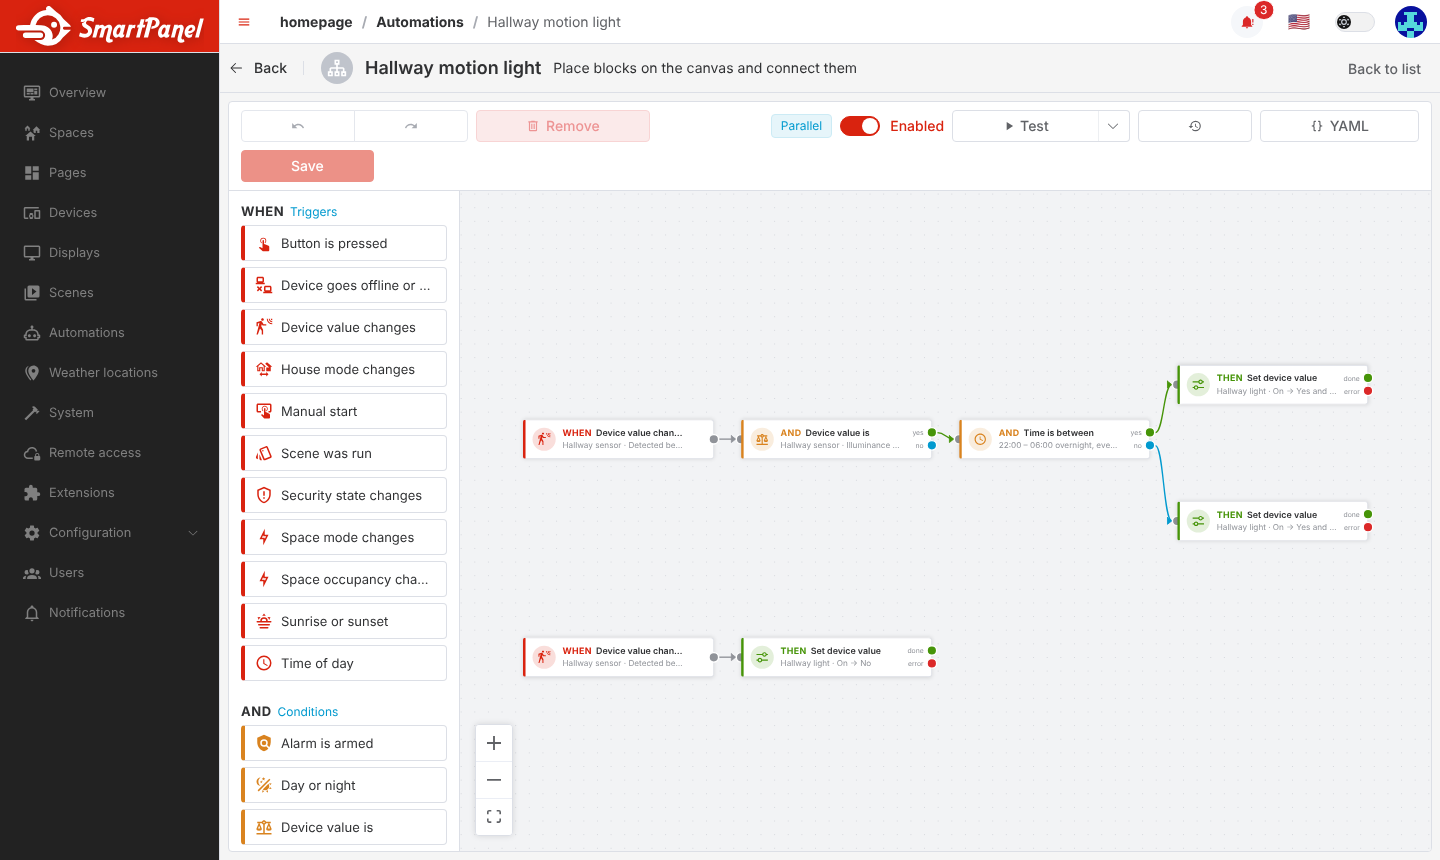
This walk-through builds a hallway light that reacts to presence:
When the occupancy sensor detects a person and the light level is low, turn on the light. If it is night, turn it on at low brightness. Once the occupancy sensor no longer detects a person for 2 minutes, turn the light off.
Create the automation
Click Add automation, enter a Name (e.g. “Hallway motion light”) and pick the Space “Hallway”.
Choose the run mode
This automation holds two independent flows — one to turn the light on, one to turn it off — and neither of them waits. Set When triggered while already running to Parallel so that the two flows never cancel each other; the built-in Motion light template does the same. Save: the flow editor opens with an empty canvas.
Add the first trigger
From the When group of the palette, drag (or tap) Device value changes onto the canvas. In the panel on the right pick the occupancy sensor’s Device, Channel and Property (e.g. Occupancy → Detected), then choose Start when the value becomes a value and To Yes.
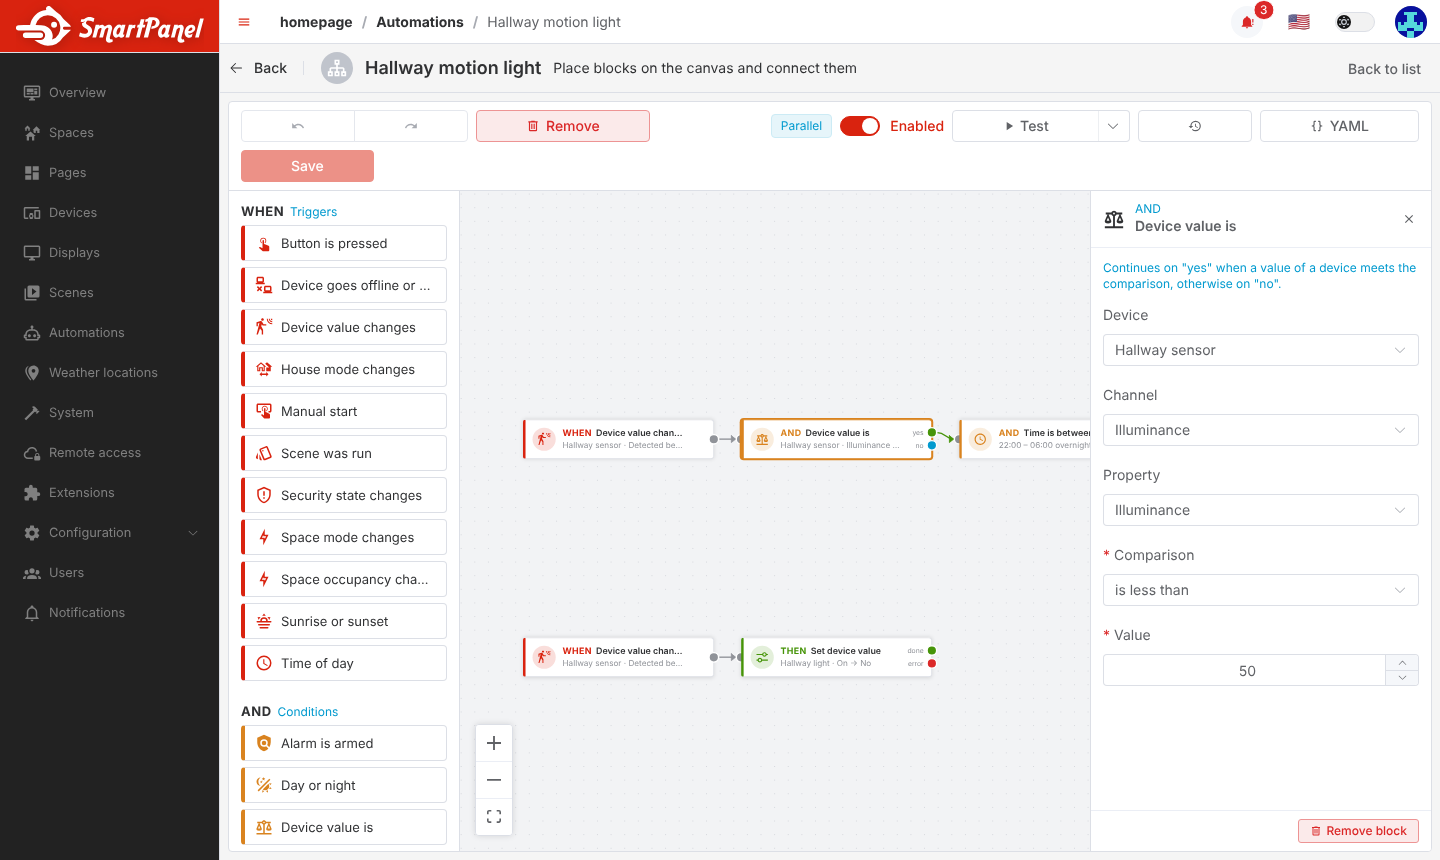
Check the light level
Add Device value is from the And group and connect the trigger’s output to it. Pick the illuminance
property, Comparison is less than and Value 50.
Check whether it is night
Add Time is between and connect the yes output of the light-level condition to it. Set From (included)
22:00 and To (not included) 06:00; the window crosses midnight.
Turn the light on
Add two Set device value actions. Connect the yes output of Time is between to the first one and set the
light’s On to Yes and Brightness to 20. Connect the no output to the second one and set On to Yes
and Brightness to 100. Use Add value to put both values into one action: values of one device are
applied together.
Turn the light off after two minutes
Add a second Device value changes trigger on the same occupancy property with To No, tick Only once it
has stayed like this for and enter 2 minutes. Connect it to a Set device value action that sets On to
No.
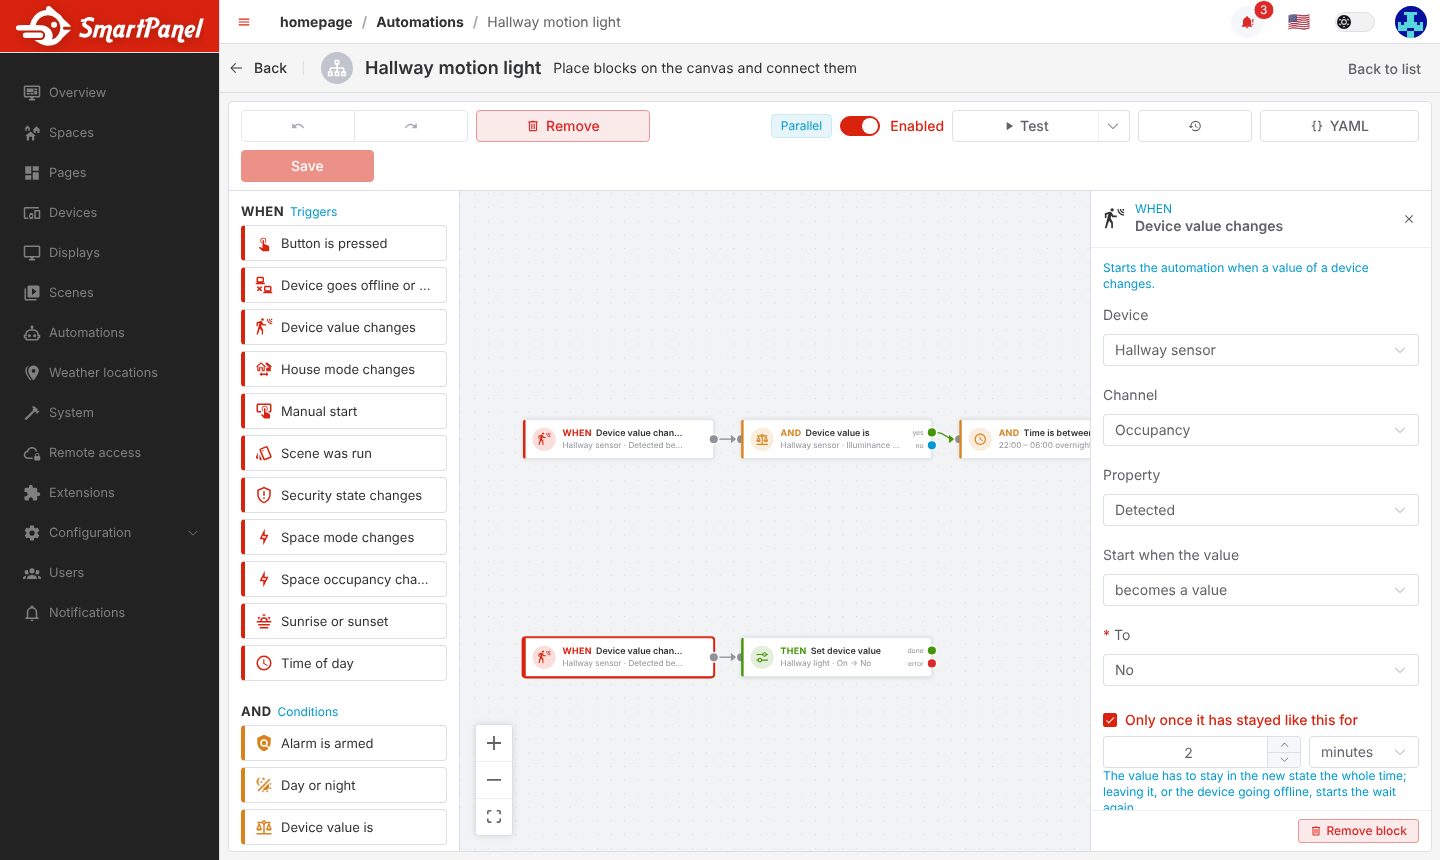
When somebody walks in again within the two minutes, the occupancy is no longer clear, so the wait never completes and the light stays on — no Delay, and nothing to cancel.
Save and enable
Click Save. Problems in the flow are listed below the canvas. Then switch Enabled on.
The editor keeps an undo and redo history while you edit. Nothing is stored until you click Save; if somebody else saved the automation meanwhile, you choose which version to keep.
Testing and Reading a Run
Test
Test in the editor toolbar runs the saved flow now, as if its trigger had fired, and follows it live on the canvas. When the flow has several triggers, the arrow next to the button lets you choose where to start. The automation has to be saved, enabled and not invalid or suspended to be tested.
A test is a real run: its actions really switch your devices.
Run history and trace
Click the history button in the toolbar to show the Runs of the automation. Select a run to replay it on the canvas:
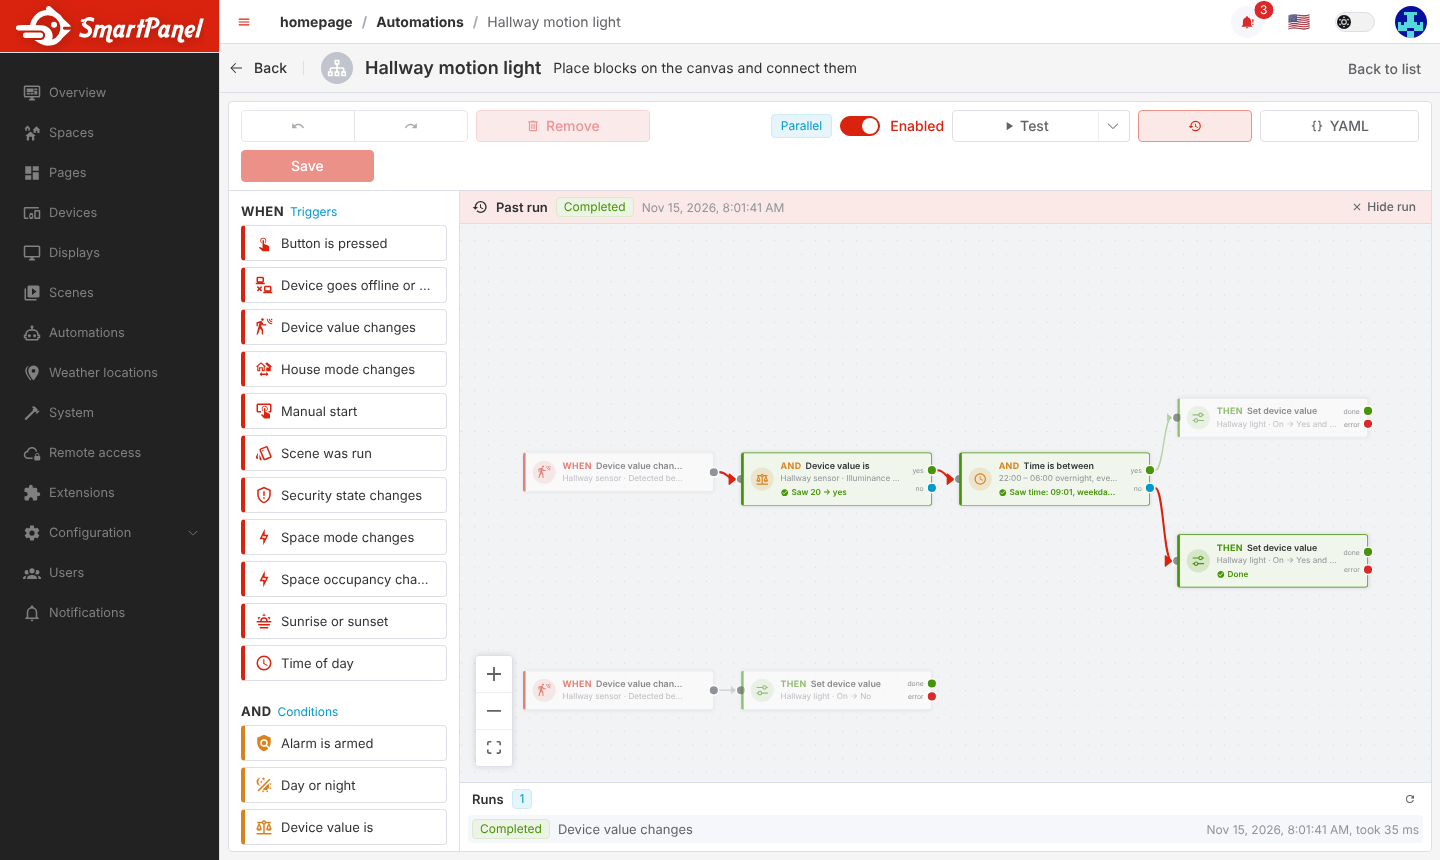
- The lines the run followed are highlighted; blocks it did not reach are dimmed.
- Each condition shows what it saw and which output it took (e.g. Saw 20 → yes).
- Each action shows whether it was Done, Failed (with the reason) or Not allowed by the safety policy.
- A Delay shows how long it waited, or that the run was still waiting there when it stopped.
A run ends as:
| Status | Meaning |
|---|---|
| Completed | The run followed every branch to its end. |
| Failed | An action failed and nothing handled its error output, or the run hit an internal limit. |
| Cancelled | The automation was triggered again under Restart, saved with changes, disabled or suspended. |
| Interrupted | The server restarted, or automations were stopped, while the run was waiting. What was to happen afterwards never happened. |
The last 50 runs of each automation are kept, for at most 30 days.
When an automation does not run
- Invalid — a block is not configured correctly, or a device, property, scene, space or automation it refers to was removed, or a plugin providing a block was disabled. The editor lists the blocks to fix.
- Suspended — the automation started more than 30 times in a minute or more than 200 times in an hour, and a notification was raised. This usually means an action sets a value one of its own triggers watches. Fix the flow, then save it or enable it again to resume it. The editor also warns when an action sets a value its own trigger watches.
- A trigger fires only on a change: the first value reported by a device, or the same value reported again, does not start anything, and a value that goes offline and comes back unchanged is not a change.
Templates
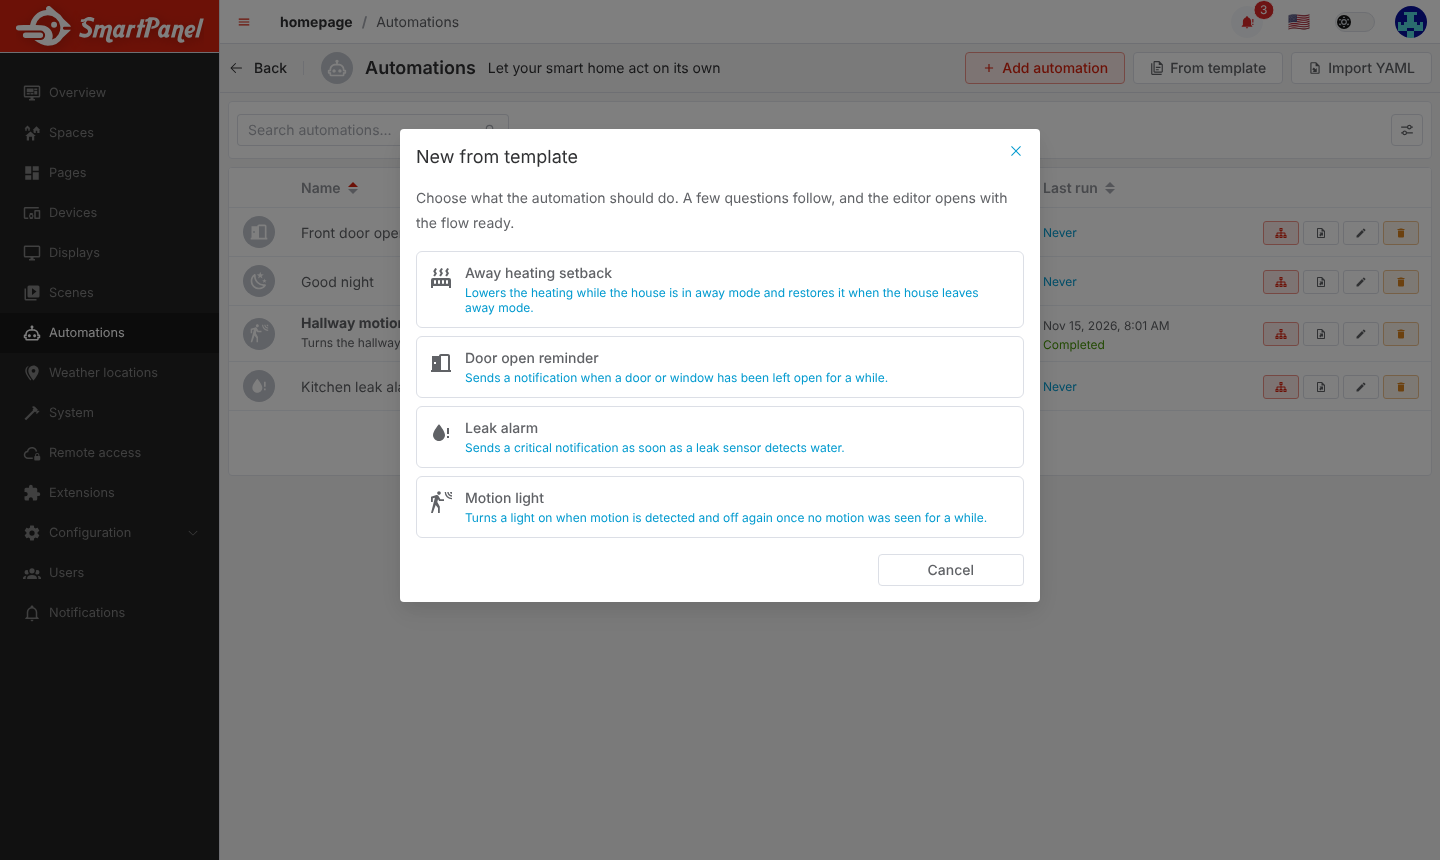
From template creates the common automations from a few questions instead of a blank canvas:
| Template | What it builds |
|---|---|
| Motion light | Turns a light on when motion is detected and off again once no motion was seen for a while. |
| Door open reminder | Sends a notification when a door or window has been left open for a while. |
| Away heating setback | Lowers the heating while the house is in away mode and restores it when the house leaves away mode. |
| Leak alarm | Sends a critical notification as soon as a leak sensor detects water. |
Pick a template, answer its questions (which sensor, which light, how long), then name the automation. The generated flow opens in the editor, where you can change it before saving it. The automation stays disabled until you enable it, and it keeps no link to the template.
Templates are YAML files. You can add your own as module.automations.*.yaml files in the configuration
directory (or any *.yaml file under the directory named by FB_AUTOMATIONS_TEMPLATES_PATH). A template with
the same ID as a built-in one replaces it.
Import and Export
An automation can be shared or backed up as a YAML file:
- Export YAML in the list, or the YAML menu in the editor, downloads the saved automation. View as YAML shows it without downloading. The file holds the name, description, icon, run mode, space and flow — nothing that belongs to one installation, such as the enabled state or the run history.
- Import YAML reads such a file (at most 256 KB). Devices, properties, scenes, spaces and automations the file refers to that do not exist here are listed, and you can point each of them at one of your own. The automation is imported disabled; fix any remaining blocks in the editor before you enable it.
What Automations Are Not Allowed to Do
An automation acts without anybody present, so it may lock, arm and close, but never unlock a lock, disarm the alarm or open a door, garage door or gate.
- A Set device value that would do so cannot be saved — not even in a disabled draft. The value is marked Not allowed in an automation.
- Arm alarm offers only the armed states; there is no disarm block.
- A Run scene is checked every time it runs: a scene that would unlock, disarm or open something is not run,
and the action takes
error. - Every action is checked again right before it executes. A refusal is shown in the run trace as Not allowed.
Valves and window coverings are not covered — watering and blinds are what automations are for. A garage door that an integration exposes as a window covering is protected only when its device has the door category.
Automations Elsewhere
On the panel
A room’s overview on the panel lists the automations assigned to that space, with their status and an on/off switch. Nothing else about an automation can be changed on the panel; the flow is edited in the admin.
Buddy and MCP
Buddy and MCP clients can work with automations through three tools:
| Tool | What it does | MCP capability |
|---|---|---|
list_automations | Lists automations with their space, enabled state, status and last run | read |
run_automation | Runs an enabled automation now, without waiting for it | trigger |
set_automation_enabled | Switches an automation on or off | write |
No tool creates, edits or deletes an automation or reveals its flow. Automations act with their own origin, so Buddy does not learn your habits from what automations do.
Suggested by Buddy
When Buddy notices that you repeat the same device changes around the same time of day, the automations list shows a Suggested by Buddy box. A suggestion is a Time of day trigger followed by a Set device value action with the changes Buddy observed. Open in editor works like a template: name the automation, and the suggested flow opens in the editor, where it is saved only when you save it; the automation stays disabled until you enable it. Dismiss removes the suggestion. Only routines that would pass the safety policy are suggested, and suggestions are shown in the admin only.
Blocks from extensions
Plugins and installable extensions can add their own triggers, conditions and actions. They appear in the palette next to the built-in blocks and are edited with a form built from the block’s description. See the extension SDK guide .
Limits
| Limit | Value |
|---|---|
| Automations | 200 |
| Blocks per automation | 100 |
| Connections per automation | 400 |
| Delay and Wait until | 1 hour |
| ”For” duration of a trigger | 7 days |
| Values per Set device value | 20 |
| Parallel runs of one automation | 10 |
| Runs before suspension | 30 per minute, 200 per hour |
| Runs kept per automation | 50, for at most 30 days |
| Import file | 256 KB |
What’s Next?
- Create Scenes for presets an automation can run
- Organize devices into Spaces to find automations by room
- Connect an agent through the Model Context Protocol to list and run automations